Samsung S22 Ultra: Top 15 settings to consider adjusting
Getting a new phone, there's always a lot to setup and especially if you want it to your taste. Here' we'll go over the top 15 settings we think you should consider changing on your new Samsung Galaxy S22 / Plus / Ultra
System settings
#1 Dark mode
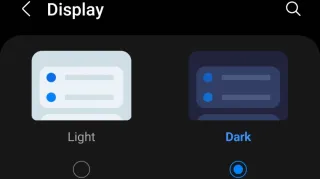
Dark mode makes it more pleasant for the eyes, especially during night and also have the benefit on OLED displays that it uses less power. As OLED displays turn of the areas of the screen that's completely black, meaning it doesn't draw power
1) Open settings and find Display 2) On the top, you can select between Light and Dark, select Dark 3) Now all areas of your phone and supported apps will be in dark mode
If you want Dark mode only at night or certain hours, then that's also possible 1) Open settings and find Display 2) Select Dark mode settings 3) Toggle on Turn on as scheduled 4) Select either Sunset to sunrise or Custom schedule
#2 Eye comfort
Eye comfort turns the screen colors warmer and reducing blue colors, to better protect your eyes1) Open settings and find Display 2) Click on Eye comfort shield 3) Turn it on and select Adaptive
Adaptive means it will turn on during night in the region you selected and of during day time
#3 System Update
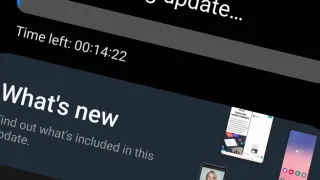
Even phones on launch days, often get day one system updates. These updates often bring stability and new features
1) Go into Settings > Software update 2) Click on Download and install 3) Apply updates, if available (recommend to be on WiFi, as updates can be pretty big)
#4 Notification history
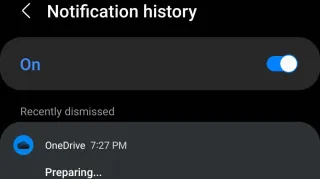
Sometimes you get an important notification or just didn't see what popped up, before it disappeared. By turning on notification history, you can see the last 24 hours of notifications, even if you dismissed them. By opening Notification history
1) Swipe down from the top twice 2) Click on the three dots in top right corner 3) Select Status bar 4) Click on Notification history and turn on
You can also search for Notification history in Settings
#5 Add Extra Ram (2/4/6/8 GB)
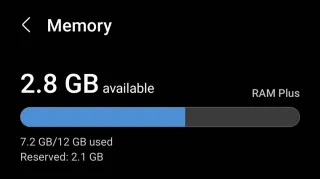
Samsung has something they call RAM Plus, which allow you to add up to addition 8 GB of RAM to your device, by using storage for RAM. It won't be as fast as dedicated RAM, but still will help if you use your phone for RAM intensive activities
1) Go to Settings > Battery and device care 2) Select Memory > RAM Plus 3) Pick how much storage you wish to set aside for RAM (2/4/6/8 GB) 4) Phone will restart for changes to take affect
If you do not see RAM Plus, then please ensure you're updated to latest available system update
#6 Screen timeout
1) Open settings and find Display 2) Click on [b]Screen timeout/b] 3) Pick how quick your screen should turn of when inactive, between 15 seconds to 10 minutes
S Pen (most for Ultra)
S Pen works with all S22 models, but is only included in the box with S22 Ultra#7 Menu Style
By default the S Pen Menu will cover the entire screen, but you can make it more compact1) Pull out the S Pen 2) Click on the pen icon bubble > Settings 3) Find Menu Style 4) Choose Compact if you want a smaller layout on the screen or Standard if you wish it should take entire screen
Change what power button does
The power button supports three functions, while two can be customized. Press will turn screen (on/off) and is not customizable, while long press and double tap are both customizable#8 Press and hold
By default, if you press and hold the power button, Bixby will launch. On most other Android phones, this action would normally open options to shutdown and restart1) Go into Settings > Advance features 2) Click on Side key 3) Under Press and hold, you can change to Power off menu
#9 Double press
By default this feature is off. This you can change to whatever app you wish, I have it set to flash light1) Go into Settings > Advance features 2) Click on Side key 3) Ensure Double press is on 4) Under Double press, you can change to either Quick launch camera or Open app (then you pick which app should be opened)
Camera
There's a few different settings in the camera app, that you probably want to adjust#10 Image format
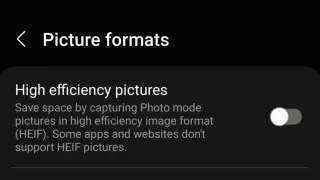
You can save images in Apple's HEIF (.heic) format. Images will take about half to 1/3 space, compared to jpeg/jpg and will have same or better image quality
If it's so much better, why isn't HEIF on as default you might wonder and the reason is simple, support. Many devices and websites do not support HEIF yet. So if you plan to share or upload your images to websites or in apps, you might not be able to, without converting the images first to another format. We here at bonty do not yet support HEIF image uploads, we hope to do in the future, but we are waiting on some of the underlaying website software to add support for the HEIF format and we're not alone in that situation
Still, support for the format is growing. Apple have supported it since 2017, Microsoft and Android have added support for it. So depending on your usage, you might have zero issues using this format
1) Go into Camera-app 2) Select Photo-mode 3) Go into Settings (cog) 4) Find Picture format, under Picture-section 5) Enable High efficiency picture (HEIF), turn off to revert to JPG (JPEG)
#11 Save selfies as previewed
Saves the photos as you see them in the preview, before taking the photo and doesn't flip the image1) Go into Camera-app 2) Select Photo-mode 3) Go into Settings (cog) 4) Enable Save selfies as previewed
#12 Video Quality
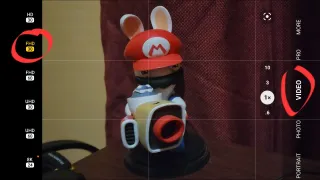
By default, video quality will be set quite low and you probably want it saved a bit higher
First part is resolution; HD (High Definition) = 720P, FHD (Full HD) = 1920P, UHD Ultra HD = 2160P and 8k = 8000P. While the digits behind stands for framerate, so you'll either get 24, 30 or 60 FPS (Frames Per Second)
1) Go into Camera-app 2) Select Video-mode 3) Click on FHD 30 icon (will show current value, so can be something else if you changed it already) 4) Now you can change between (from low to high); HD 30, FHD 30 (default), FHD 60, UHD 30, UHD 60 and 8K 24
Home screen layout
Beside moving icons around the screen, you can also select how many icons you can see per screen#13 Home screen grid
1) Press and hold your finger on your home screen 2) Select Settings in the new menu that appear 3) Go into Home screen grid 4) Pick how many icons you want per screen (lowest to most); 4x5, 4x6, 5x5 or 5x6 5) Press save#14 Apps screen grid
1) Press and hold your finger on your home screen 2) Select Settings in the new menu that appear 3) Go into Apps screen grid 4) Pick how many icons you want per screen (lowest to most); 4x5, 4x6, 5x5 or 5x6 5) Press save#15 Folder grid
1) Press and hold your finger on your home screen 2) Select Settings in the new menu that appear 3) Go into Folder grid 4) Pick how many icons you want per screen (lowest to most); 3x4 or 4x4 5) Press saveThat's the top 15 settings we think you should consider adjusting. Did we miss anything? Let us know in the comments below